车床用球面切削装置的设计【带PROE三维】【4张图纸】【优秀】
收藏
资源目录

压缩包内文档预览:(预览前20页/共32页)
编号:421923
类型:共享资源
大小:3.79MB
格式:RAR
上传时间:2015-03-30
上传人:上***
认证信息
个人认证
高**(实名认证)
江苏
IP属地:江苏
45
积分
- 关 键 词:
-
车床
球面
切削
装置设计
proe三维
图纸
球面切削
球面切削装置
- 资源描述:
-
车床用球面切削装置的设计
30页 11000字数+proe三维图纸+说明书+任务书+开题报告+外文翻译+4张CAD图纸【详情如下】
proe三维图纸.rar
中期检查.doc
任务书.doc
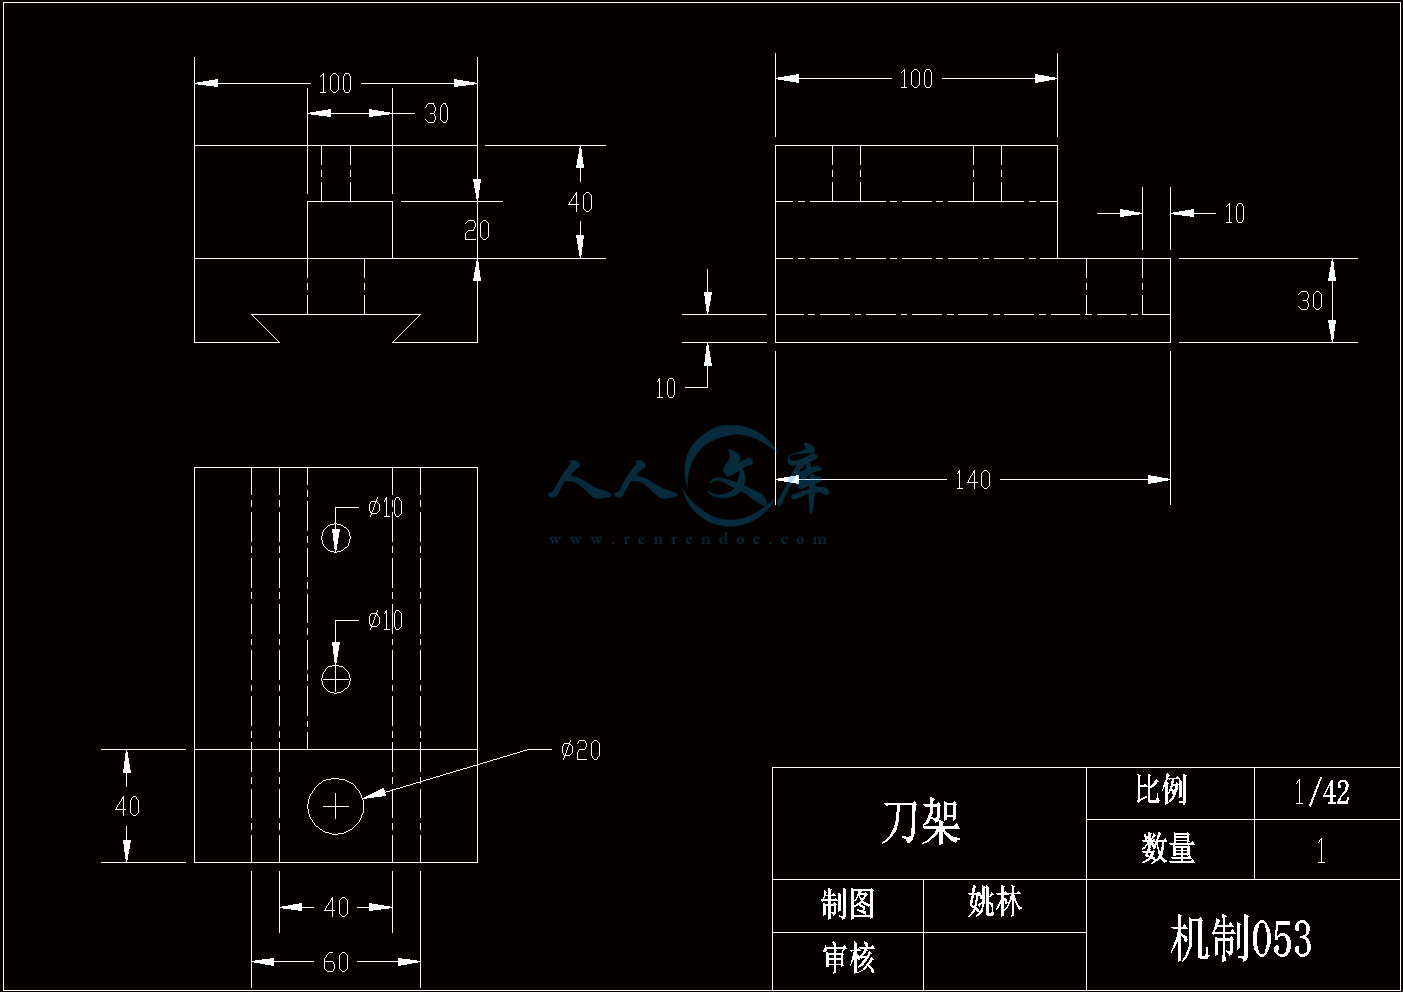
刀架.dwg
圆盘.dwg
外文翻译--机械加工.doc
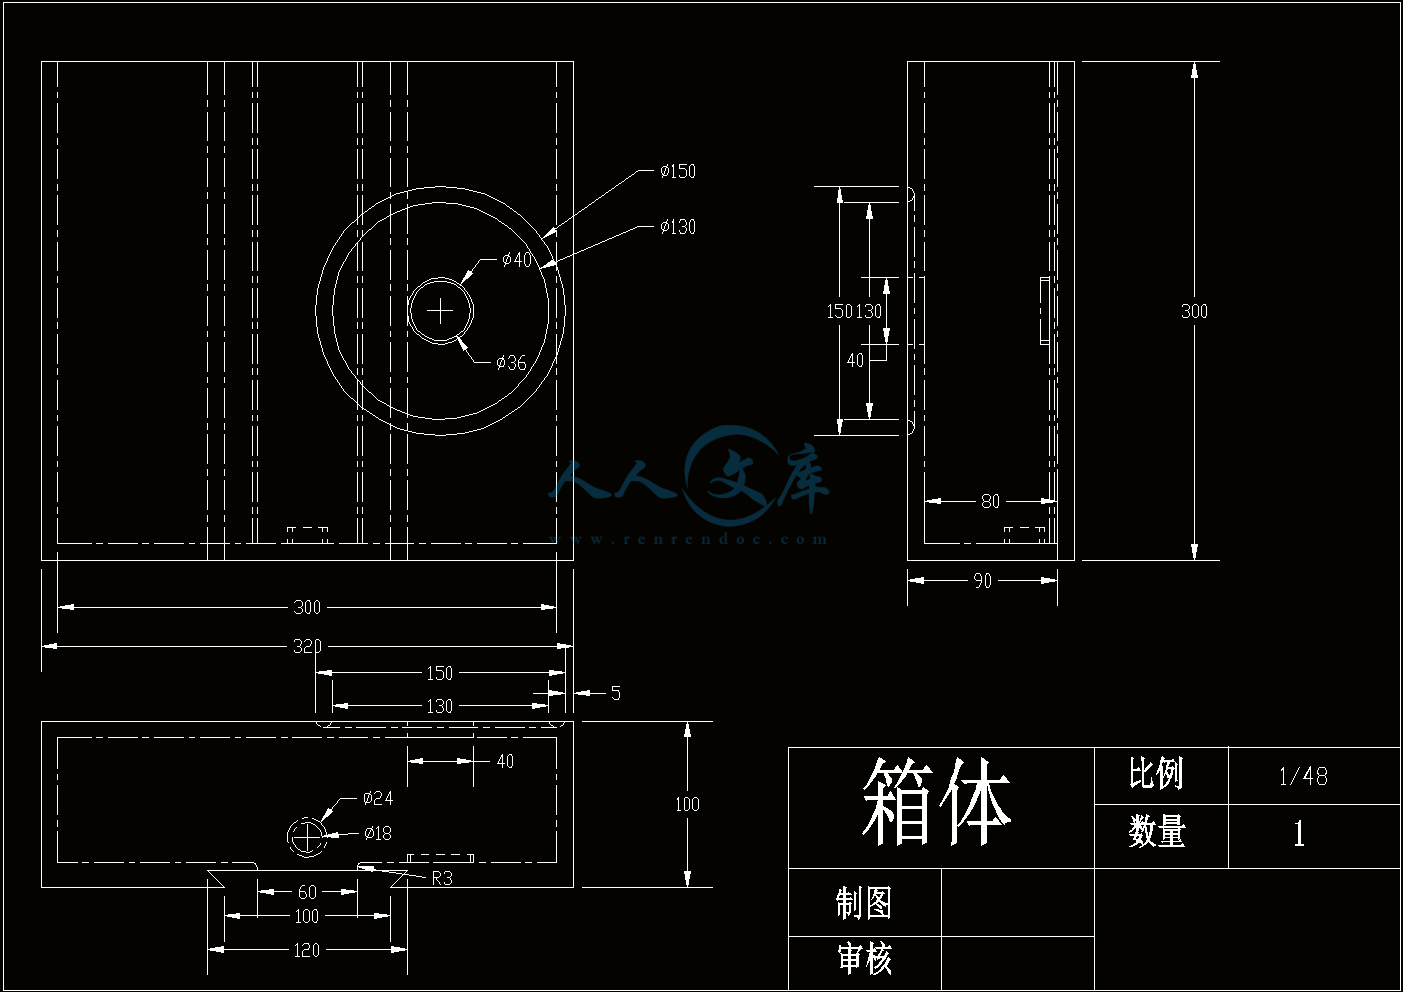
箱体.dwg
装配图.dwg
课题审核表.doc
车床用球面切削装置的设计开题报告.doc
车床用球面切削装置的设计说明书.doc


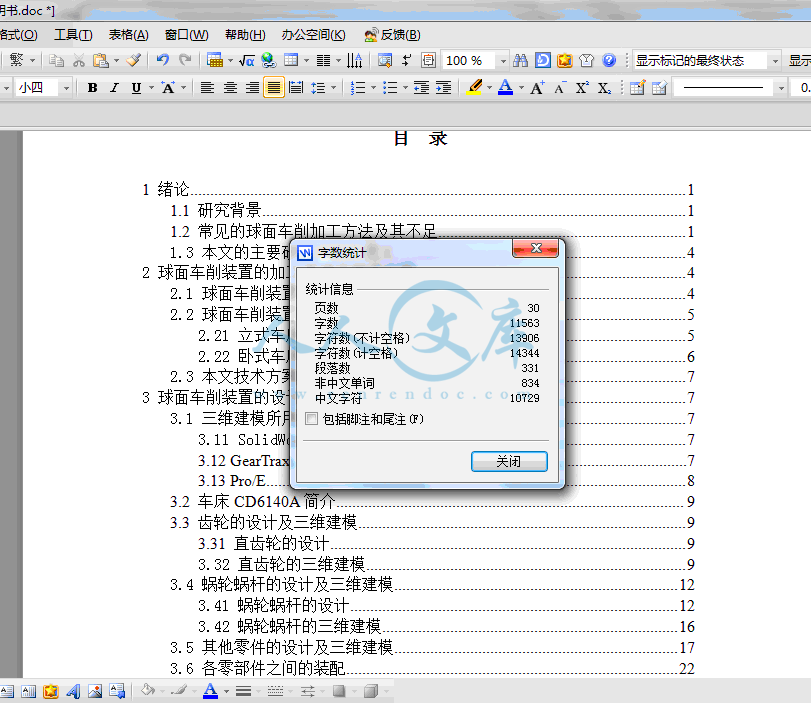
目 录
1 绪论1
1.1 研究背景1
1.2 常见的球面车削加工方法及其不足1
1.3 本文的主要研究内容及意义4
2 球面车削装置的加工原理及技术方案4
2.1 球面车削装置的加工原理4
2.2 球面车削装置的技术方案5
2.21 立式车床用球面车削装置的技术方案实例5
2.22 卧式车床用球面车削装置的技术方案实例6
2.3 本文技术方案的确定7
3 球面车削装置的设计及三维建模7
3.1 三维建模所用到的软件7
3.11 SolidWorks 软件平台7
3.12 GearTrax7
3.13 Pro/E8
3.2 车床CD6140A简介9
3.3 齿轮的设计及三维建模9
3.31 直齿轮的设计9
3.32 直齿轮的三维建模9
3.4 蜗轮蜗杆的设计及三维建模12
3.41 蜗轮蜗杆的设计12
3.42 蜗轮蜗杆的三维建模16
3.5 其他零件的设计及三维建模17
3.6 各零部件之间的装配22
3.7 装置的安装及工作原理的简单介绍24
结论及展望25
结论25
今后的工作方向25
致谢26
参考文献26
1.1 研究背景
在机械加工行业中,球形零件广泛应用于汽车、化工、航天、航空等领域,所以经常会遇到球形表面的加工。但加工方法比较复杂,而且各种球面零件的规格也不尽相同,给生产加工带来许多不便,是车削生产中长期没有解决的技术难题。
1.2 常见的球面车削加工方法及其不足
加工外球面零件多采用车削的方法,此前国内尚无专用设备,车削外球面时一般采用数控车床和液压仿形车床。由于这类车床结构复杂、维修困难、效率低和价格昂贵等缺点,外球面零件生产厂家很少采用。为应付生产急需,各厂普遍采用在通用机床上改装的办法。因力量分散,各厂的基础也不尽相同, 改装所采用的原理五花八门,对各种原理的优缺点缺乏系统地对比和分析。再者受原设备条件的限制,改装的机床往往结构不尽合理,刚性较差,车削精度和效率均较低, 增加了外球面磨削工序的困难。外球面磨削工序采用切入磨削时,要求外球面车削工序产生的球形误差尽可能小。但是, 因为外球面的球形误差没有简单的测量方法,无法采取随时测量零件加工精度。然后根据测量结果调整机床的方法来保证球形精度, 因而只能依靠合理的工艺方法来保证球形精度。
下面介绍几种典型的外球面车削工艺方法,并对他们的优缺点进行简单的分析。
1)双手控制法,数量较少时或单件球面零件,可以采用双手控制法进行车削。就是用双手同时摇动中、小拖板,通过双手的合成运动,车出所要求的球面。双手控制车削球面的优点是:不需要其它特殊工具就能加工出球面。缺点是:加工的零件精度不高,操作者必须具有熟练的技巧,而且生产效率较低。
2)机械靠模法,靠模法车削原理如图1-1所示。 它是依靠车刀根据靠模的形状平行移动车出所需表面形状的一种方法。该方法的最大优点就是更换加工品种容易,特别适合小批量、多品种和型面复杂零件的车削加工。但是,由其原理所决定,车削精度较底,车削外球面时所产生的球形误差较大,这可从以下几个方面来分析。
(1)刀尖圆弧形状对球形误差的影响
由图1-1可以看出,在球面车削过程中, 由于车刀平行移动, 车刀与工件的接触点将随着车刀平移而变化。开始车削是在A点接触,然后逐渐过渡到B点, 最后在C点退出车削。因此,要使车出的表面形状为一球形,必须保证车刀刀尖
- 内容简介:
-
河南科技学院本科毕业论文(设计)中期进展情况检查表学生姓名姚林班级机制053班指导教师陈锡渠论文(设计)题目车床用球面切削装置的设计目前已完成任务1. 完成开题报告和外文翻译,交指导老师审查。2. 查阅大量相关文献。3. 基本完成论文草稿。4. 根据草稿完善开题报告。5. 初步学习SolidWorks及Pro/E软件。是否符合任务书要求进度:符合尚需完成的任务1部分零件的建模以及装配。2 论文正文的书写。能否按期完成论文(设计):根据目前进度能按期完成论文存在问题和解决办法存在问题1装置的设计还有待改进2论文的思路不是很顺畅3Pro/E及SolidWorks的运用存在一些问题拟采取的办法1 查看有关资料,及时完成论文。2及时和指导老师沟通,请教老师。3 对Pro/E及SolidWorks软件要进一步更深的学习。指导教师签 字日期年 月 日教学院长(主任)意 见 负责人签字: 年 月 日毕业论文(设计)任务书题目名称 车床用球面切削装置的设计学生姓名姚林所学专业机械设计制造及其自动化班级051班指导教师姓名陈锡渠所学专业机械设计制造及其自动化职称副教授完成期限 2008年12月12日 至 2009年1月9日一、论文(设计)主要内容及主要技术指标(一)主要内容车床用球面切削装置的工作原理分析,结构设计(包括车刀安装机构、直径调节机构、与机床连接机构、分度机构等)。(二)主要技术指标最大球面直径:200mm二、 毕业论文(设计)的基本要求1.毕业设计报告:有400字左右的中英文摘要,正文后有20篇左右的参考文献,正文中要引用5篇以上文献,并注明文献出处。2.有不少于2000汉字的与本课题有关的外文翻译资料。3.毕业设计字数在20000字以上。4.三维模型,相关图纸。三、毕业论文(设计)进度安排1. 2008年12月12日-2009年1月9日,下达毕业设计任务书;寒假期间完成英文资料翻译和开题报告。2. 2009年2月16-2月27日(第1-2周),指导教师审核开题报告和设计方案。3. 2009年3月2日-4月24日(第3-10周),毕业设计单元部分设计。4. 2009年4月26日-5月1日(第10=11周),毕业设计中期检查。5. 2009年5月4日-5月22日(第12-14周),结构设计、三维建模,整理、撰写毕业设计论文。6. 2009年5月25-6月5日(第15-16周)上交毕业设计论文,指导教师、评阅教师审查评阅设计论文,毕业设计答辩资格审查。毕业设计答辩,学生修改整理设计论文。毕业设计相关英文资料翻译班 级: 姓 名: 指导教师: 日 期: Introduction of MachiningHave a shape as a processing method, all machining process for the production of the most commonly used and most important method. Machining process is a process generated shape, in this process, Drivers device on the workpiece material to be in the form of chip removal. Although in some occasions, the workpiece under no circumstances, the use of mobile equipment to the processing, However, the majority of the machining is not only supporting the workpiece also supporting tools and equipment to complete.Machining know the process has two aspects. Small group of low-cost production. For casting, forging and machining pressure, every production of a specific shape of the workpiece, even a spare parts, almost have to spend the high cost of processing. Welding to rely on the shape of the structure, to a large extent, depend on effective in the form of raw materials. In general, through the use of expensive equipment and without special processing conditions, can be almost any type of raw materials, mechanical processing to convert the raw materials processed into the arbitrary shape of the structure, as long as the external dimensions large enough, it is possible. Because of a production of spare parts, even when the parts and structure of the production batch sizes are suitable for the original casting, Forging or pressure processing to produce, but usually prefer machining.Strict precision and good surface finish, Machining the second purpose is the establishment of the high precision and surface finish possible on the basis of. Many parts, if any other means of production belonging to the large-scale production, Well Machining is a low-tolerance and can meet the requirements of small batch production. Besides, many parts on the production and processing of coarse process to improve its general shape of the surface. It is only necessary precision and choose only the surface machining. For instance, thread, in addition to mechanical processing, almost no other processing method for processing. Another example is the blacksmith pieces keyhole processing, as well as training to be conducted immediately after the mechanical completion of the processing.Primary Cutting ParametersCutting the work piece and tool based on the basic relationship between the following four elements to fully describe : the tool geometry, cutting speed, feed rate, depth and penetration of a cutting tool.Cutting Tools must be of a suitable material to manufacture, it must be strong, tough, hard and wear-resistant. Tool geometry - to the tip plane and cutter angle characteristics - for each cutting process must be correct.Cutting speed is the cutting edge of work piece surface rate, it is inches per minute to show. In order to effectively processing, and cutting speed must adapt to the level of specific parts - with knives. Generally, the more hard work piece material, the lower the rate.Progressive Tool to speed is cut into the work piece speed. If the work piece or tool for rotating movement, feed rate per round over the number of inches to the measurement. When the work piece or tool for reciprocating movement and feed rate on each trip through the measurement of inches. Generally, in other conditions, feed rate and cutting speed is inversely proportional to。Depth of penetration of a cutting tool - to inches dollars - is the tool to the work piece distance. Rotary cutting it to the chip or equal to the width of the linear cutting chip thickness. Rough than finishing, deeper penetration of a cutting tool depth.Wears of Cutting ToolWe already have been processed and the rattle of the countless cracks edge tool, we learn that tool wear are basically three forms : flank wear, the former flank wear and V-Notch wear. Flank wear occurred in both the main blade occurred vice blade. On the main blade, shoulder removed because most metal chip mandate, which resulted in an increase cutting force and cutting temperature increase, If not allowed to check, That could lead to the work piece and the tool vibration and provide for efficient cutting conditions may no longer exist. Vice-bladed on, it is determined work piece dimensions and surface finish. Flank wear size of the possible failure of the product and surface finish are also inferior. In most actual cutting conditions, as the principal in the former first deputy flank before flank wear, wear arrival enough, Tool will be effective, the results are made unqualified parts.As Tool stress on the surface uneven, chip and flank before sliding contact zone between stress, in sliding contact the start of the largest, and in contact with the tail of zero, so abrasive wear in the region occurred. This is because the card cutting edge than the nearby settlements near the more serious wear, and bladed chip due to the vicinity of the former flank and lost contact wear lighter. This results from a certain distance from the cutting edge of the surface formed before the knife point Ma pit, which is usually considered before wear. Under normal circumstances, this is wear cross-sectional shape of an arc. In many instances and for the actual cutting conditions, the former flank wear compared to flank wear light, Therefore flank wear more generally as a tool failure of scale signs. But because many authors have said in the cutting speed of the increase, Maeto surface temperature than the knife surface temperatures have risen faster. but because any form of wear rate is essentially temperature changes by the significant impact. Therefore, the former usually wear in high-speed cutting happen.The main tool flank wear the tail is not processed with the work piece surface in contact, Therefore flank wear than wear along with the ends more visible, which is the most common. This is because the local effect, which is as rough on the surface has hardened layer, This effect is by cutting in front of the hardening of the work piece. Not just cutting, and as oxidation skin, the blade local high temperature will also cause this effect. This partial wear normally referred to as pit sexual wear, but occasionally it is very serious. Despite the emergence of the pits on the Cutting Tool nature is not meaningful impact, but often pits gradually become darker If cutting continued the case, then there cutter fracture crisis.If any form of sexual allowed to wear, eventually wear rate increase obviously will be a tool to destroy failure destruction, that will no longer tool for cutting, cause the work piece scrapped, it is good, can cause serious damage machine. For various carbide cutting tools and for the various types of wear, in the event of a serious lapse, on the tool that has reached the end of the life cycle. But for various high-speed steel cutting tools and wear belonging to the non-uniformity of wear, has been found : When the wear and even to allow for a serious lapse, the most meaningful is that the tool can re-mill use, of course, In practice, cutting the time to use than the short time lapse. Several phenomena are one tool serious lapse began features : the most common is the sudden increase cutting force, appeared on the work piece burning ring patterns and an increase in noise.The Effect of Changes in Cutting Parameters on Cutting TemperaturesIn metal cutting operations heat is generated in the primary and secondary deformation zones and this results in a complex temperature distribution throughout the tool, workpiece and chip. A typical set of isotherms is shown in figure where it can be seen that, as could be expected, there is a very large temperature gradient throughout the width of the chip as the workpiece material is sheared in primary deformation and there is a further large temperature in the chip adjacent to the face as the chip is sheared in secondary deformation. This leads to a maximum cutting temperature a short distance up the face from the cutting edge and a small distance into the chip.Since virtually all the work done in metal cutting is converted into heat, it could be expected that factors which increase the power consumed per unit volume of metal removed will increase the cutting temperature. Thus an increase in the rake angle, all other parameters remaining constant, will reduce the power per unit volume of metal removed and cutting temperatures will reduce. When considering increase in undeformed chip thickness and cutting speed the situation is more comples. An increase in undeformed chip thickness and cutting speed the situation is more complex. An increase in undeformed chip thickness tends to be a scale effect where the amounts of heat which pass to the workpiece, the tool and chip remain in fixed proportions and the changes in cutting temperature tend to be small. Increase in cutting speed, however, reduce the amount of heat which passes into the workpiece and this increase the temperature rise of the chip in primary deformation. Further, the secondary deformation zone tends to be smaller and this has the effect of increasing the temperatures in this zone. Other changes in cutting parameters have virtually no effect on the power consumed per unit volume of metal removed and consequently have virtually no effect on the power consumed per unit volume of metal removed and consequently have virtually no effect on the cutting temperatures. Since it has been shown that even small changes in cutting temperature have a significant effect on tool wear rate, it is appropriate to indicate how cutting temperatures can be assessed from cutting data.The most direct and accurate method for measuring temperatures in high-speed-steel cutting tools is that of Wright&Trent which also yields detailed information on temperature distributions in high-speed-steel tools which relates microstructural changes to thermal history.Trent has described measurements of cutting temperatures and temperature distributions for high-speed-steel tools when machining a wide range of workpiece materials. This technique has been further developed by using scanning electron microscopy to study fine-scale microstructural changes srising from over tempering of the tempered martensitic matrix of various high-speed-steels. This technique has also been used to study temperature distributions in both high-speed-steel single point turning tools and twist drills.Automatic Fixture DesignAssembly equipment used in the traditional synchronous fixture put parts of the fixture mobile center, to ensure that components from transmission from the plane or equipment plate placed after removal has been scheduled for position. However, in certain applications, mobile mandatory parts of the center line, it may cause parts or equipment damage. When parts vulnerability and may lead to a small vibration abandoned, or when their location is by machine spindle or specific to die, Tolerance again or when the request is a sophisticated, it would rather let the fixture to adapt to the location of parts, and not the contrary. For these tasks, Elyria, Ohio, the company has developed Zaytran a general non-functional data synchronization West category FLEXIBILITY fixture. Fixture because of the interaction and synchronization devices is independent, The synchronous device can use sophisticated equipment to replace the slip without affecting the fixture force. Fixture specification range from 0.2 inches itinerary, 5 pounds clamping force of the six-inch trip, 400-inch clamping force.The characteristics of modern production is becoming smaller and smaller quantities and product specifications biggest changes. Therefore, in the final stages of production, assembly of production, quantity and product design changes appear to be particularly vulnerable. This situation is forcing many companies to make greater efforts to rationalize the extensive reform and the previously mentioned case of assembly automation. Despite flexible fixture behind the rapid development of flexible transport and handling devices, such as backward in the development of industrial robots, it is still expected to increase the flexibility fixture. In fact the important fixture devices - the production of the devices to strengthen investment on the fixture so that more flexibility in economic support holders.According to their flexibility and fixture can be divided into : special fixture, the fixture combinations, the standard fixture, high flexible fixture. Flexible fixture on different parts of their high adaptability and the few low-cost replacement for the characteristic. Forms can transform the structure of the flexible fixture can be installed with the change of structure components (such as needle cheek plate, Multi-chip components and flake cheek plate), a non-standard work piece gripper or clamping elements (for example : commencement standard with a clamping fixture and mobile components fixture supporting documents), or with ceramic or hardening of the intermediary substances (such as : Mobile particle bed fixture and heat fixture tight fixture). To production, the parts were secured fixture, the need to generate clamping function, its fixture with a few unrelated to the sexual submissive steps :According to the processing was part of that foundation and working characteristics to determine the work piece fixture in the required position, then need to select some stability flat combination, These constitute a stable plane was fixed in the work piece fixture set position on the clamp-profile structure, all balanced and torque, it has also ensured that the work features close to the work piece. Finally, it must be calculated and adjusted, assembly or disassembly be standard fixture components required for the position, so that the work piece firmly by clamping fixture in China. In accordance with this procedure, the outline fixture structure and equipped with the planning and recording process can be automated control.Structural modeling task is to produce some stable flat combination, Thus, these plane of the work pieces clamping force and will fixture stability. According to usual practice, this task can be human-machine dialogue that is almost completely automated way to completion. A man-machine dialogue that is automated fixture structure modeling to determine the merits can be conducted in an organized and planning fixture design, reduce the amount of the design, shortening the study period and better distribution of work conditions. In short, can be successfully achieved significantly improve fixture efficiency and effectiveness.Fully prepared to structure programs and the number of material circumstances, the completion of the first successful assembly can save up to 60% of the time.Therefore fixture process modeling agencies is the purpose of the program have appropriate documents. 加工基础作为产生形状的一种加工方法,机械加工是所有制造过程中最普遍使用的而且是最重要的方法。机械加工过程是一个产生形状的过程,在这过程中,驱动装置使工件上的一些材料以切屑的形式被去除。尽管在某些场合,工件无承受情况下,使用移动式装备来实现加工,但大多数的机械加工是通过既支承工件又支承刀具的装备来完成。机械加工在知道过程中具备两方面。小批生产低费用。对于铸造、锻造和压力加工,每一个要生产的具体工件形状,即使是一个零件,几乎都要花费高额的加工费用。靠焊接来产生的结构形状,在很大程度上取决于有效的原材料的形式。一般来说,通过利用贵重设备而又无需特种加工条件下,几乎可以以任何种类原材料开始,借助机械加工把原材料加工成任意所需要的结构形状,只要外部尺寸足够大,那都是可能的。因此对于生产一个零件,甚至当零件结构及要生产的批量大小上按原来都适于用铸造、锻造或者压力加工来生产的,但通常宁可选择机械加工。严密的精度和良好的表面光洁度,机械加工的第二方面用途是建立在高精度和可能的表面光洁度基础上。许多零件,如果用别的其他方法来生产属于大批量生产的话,那么在机械加工中则是属于低公差且又能满足要求的小批量生产了。另方面,许多零件靠较粗的生产加工工艺提高其一般表面形状,而仅仅是在需要高精度的且选择过的表面才进行机械加工。例如内螺纹,除了机械加工之外,几乎没有别的加工方法能进行加工。又如已锻工件上的小孔加工,也是被锻后紧接着进行机械加工才完成的。基本的机械加工参数切削中工件与刀具的基本关系是以以下四个要素来充分描述的:刀具的几何形状,切削速度,进给速度,和吃刀深度。切削刀具必须用一种合适的材料来制造,它必须是强固、韧性好、坚硬而且耐磨的。刀具的几何形状以刀尖平面和刀具角为特征对于每一种切削工艺都必须是正确的。切削速度是切削刃通过工件表面的速率,它是以每分钟英寸来表示。为了有效地加工,切削速度高低必须适应特定的工件刀具配合。一般来说,工件材料越硬,速度越低。进给速度是刀具切进工件的速度。若工件或刀具作旋转运动,进给量是以每转转过的英寸数目来度量的。当刀具或工件作往复运动时,进给量是以每一行程走过的英寸数度量的。一般来说,在其他条件相同时,进给量与切削速度成反比。吃刀深度以英寸计是刀具进入工件的距离。它等于旋削中的切屑宽度或者等于线性切削中的切屑的厚度。粗加工比起精加工来,吃刀深度较深。切削参数的改变对切削温度的影响金属切削操作中,热是在主变形区和副变形区发生的。这结果导致复杂的温度分布遍及刀具、工件和切屑。图中显示了一组典型等温曲线,从中可以看出:像所能预料的那样,当工件材料在主变形区被切削时,沿着整个切屑的宽度上有着很大的温度梯度,而当在副变形区,切屑被切落时,切屑附近的前刀面上就有更高的温度。这导致了前刀面和切屑离切削刃很近的地方切削温度较高。实质上由于在金属切削中所做的全部功能都被转化为热,那就可以预料:被切离金属的单位体积功率消耗曾家的这些因素就将使切削温度升高。这样刀具前角的增加而所有其他参数不变时,将使切离金属的单位体积所耗功率减小,因而切削温度也将降低。当考虑到未变形切屑厚度增加和切削速度,这情形就更是复杂。未变形切屑厚度的增加趋势必导致通过工件的热的总数上产生比例效应,刀具和切屑仍保持着固定的比例,而切削温度变化倾向于降低。然而切削速度的增加,传导到工件上的热的数量减少而这又增加主变形区中的切屑温升。进而副变形区势必更小,这将在该区内产生升温效应。其他切削参数的变化,实质上对于被切离的单位体积消耗上并没有什么影响,因此实际上对切削温度没有什么作用。因为事实已经表明:切削温度即使有小小的变化对刀具磨损率都将有实质意义的影响作用。这表明如何人从切削参数来确定切削温度那是很合适的。为着测定高速钢刀具温度的最直接和最精确的方法是W&T法,这方法也就是可提供高速钢刀具温度分布的详细信息的方法。该项技术是建立在高速钢刀具截面金相显微测试基础上,目的是要建立显微结构变化与热变化规律图线关系式。当要加工广泛的工件材料时,Trent已经论述过测定高速钢刀具的切削温度及温度分布的方法。这项技术由于利用电子显微扫描技术已经进一步发展,目的是要研究将已回过火和各种马氏体结构的高速钢再回火引起的微观显微结构变化情况。这项技术亦用于研究高速钢单点车刀和麻花钻的温度分布。刀具磨损从已经被处理过的无数脆裂和刃口裂纹的刀具中可知,刀具磨损基本上有三种形式:后刀面磨损,前刀面磨损和V型凹口磨损。后刀面磨损既发生在主刀刃上也发生副刀刃上。关于主刀刃,因其担负切除大部金属切屑任务,这就导致增加切削力和提高切削温度,如果听任而不加以检查处理,那可能导致刀具和工件发生振动且使有效切削的条件可能不再存在。关于副刀刃,那是决定着工件的尺寸和表面光洁度的,后刀面磨损可能造成尺寸不合格的产品而且表面光洁度也差。在大多数实际切削条件下,由于主前刀面先于副前刀面磨损,磨损到达
- 温馨提示:
1: 本站所有资源如无特殊说明,都需要本地电脑安装OFFICE2007和PDF阅读器。图纸软件为CAD,CAXA,PROE,UG,SolidWorks等.压缩文件请下载最新的WinRAR软件解压。
2: 本站的文档不包含任何第三方提供的附件图纸等,如果需要附件,请联系上传者。文件的所有权益归上传用户所有。
3.本站RAR压缩包中若带图纸,网页内容里面会有图纸预览,若没有图纸预览就没有图纸。
4. 未经权益所有人同意不得将文件中的内容挪作商业或盈利用途。
5. 人人文库网仅提供信息存储空间,仅对用户上传内容的表现方式做保护处理,对用户上传分享的文档内容本身不做任何修改或编辑,并不能对任何下载内容负责。
6. 下载文件中如有侵权或不适当内容,请与我们联系,我们立即纠正。
7. 本站不保证下载资源的准确性、安全性和完整性, 同时也不承担用户因使用这些下载资源对自己和他人造成任何形式的伤害或损失。

人人文库网所有资源均是用户自行上传分享,仅供网友学习交流,未经上传用户书面授权,请勿作他用。
 川公网安备: 51019002004831号