Toolpathgenerationand_省略_rfive_axisNCmac.pdf

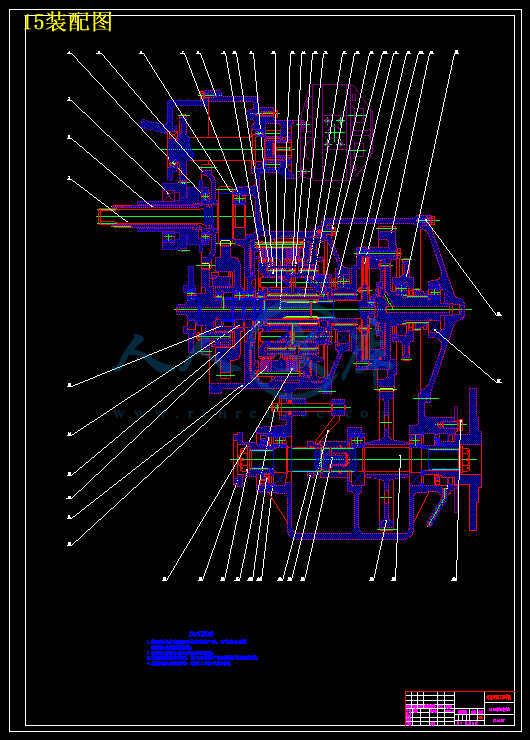
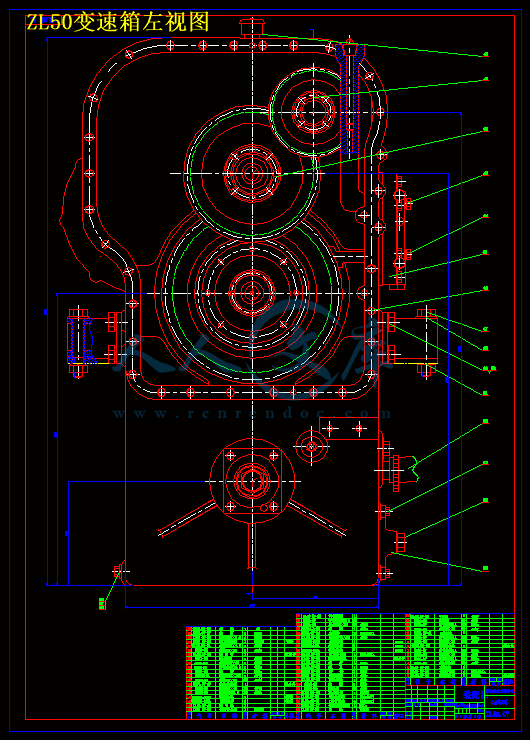
ZL50装载机总体及变速箱设计(第二行星排)【4张CAD图纸和说明书】

收藏

资源目录
跳过导航链接。
压缩包内文档预览:
预览图 预览图 预览图 预览图 预览图 预览图 预览图 预览图 预览图 预览图 预览图
编号:10415713    类型:共享资源    大小:4.55MB    格式:RAR    上传时间:2018-08-10 上传人:俊****计 IP属地:江苏
40
积分
关 键 词:
zl50 装载 总体 整体 变速箱 设计 第二 行星 cad 图纸 以及 说明书 仿单
资源描述:

摘要

Zl50装载机是我国轮式装载机系列中的中型产品,该机是一种较大型的以装卸散状物料为主的工程机械,广泛应用于矿山、基建、道路修筑、港口、货场、煤场等地进行装载、推土、铲挖、起重、牵引等作业。

本设计的步骤简单如下:1.对装载机的总体进行分析,确定总体参数;2.牵引计算,确定出各档及各档传动比;3.对装载机进行整体布置,并绘出总体布置图;4.变速箱的设计,这是本设计中最主要的部分,确定传动比,设计传动简图,配齿计算,得出齿圈、行星轮、太阳轮的齿数,并验算其合理性。然后进行齿轮设计;5.对离合器,轴、轴承的设计及选择。

此设计中,主要任务是设计变速箱及第二行星排,设计中采用了行星式动力换挡变速箱,它具有3个离合器和3根轴,且轴安装在壳体内,使变速箱结构简单、便于维修。变速箱具有两个前进挡和一个后退档,可以产生三个速度。


关键词:    装载机      液力机械传动系统      行星式动力换挡变速箱


ABSTRACT

The loader ZL50 iswheel type and it is more bigger among the series made in our country.It is suitable for loading discharging materials and it applies for mine、capital contuction、road builing 、port、field、coalfield and carries loading 、pushing dust 、diging  rising weight

The design of the simple steps are as follows: 1.the overall loader analysis , to determine the overall parameters; 2. traction calculation, determine the gear and the gear ratio; 3 .to loader for the overall layout, and draw the overall layout; 4.design of gearbox ,and it is the design of the main parts determination of design, transmission ratio, transmission diagram, gear tooth number calculation, the ring gear, a planet wheel, sun wheel, and check the rationality. Then the design of the clutch gear; 5. design and selection of shaft, bearing.

In my design, I adopt counter shaft power shift transmission’s construction is simple and maincenance is easy .the transmission has two forward and one reverse gear ,it can provide three speeds


KEY WORDS:     lorder         liquid  engine  driving  system        

Hydraulic  torque  conventer  power  shift  gearbox


目录

第1章 前言········································································· 1

第2章 总体设计·································································· 2

  2.1 概述··········································································· 2

  2.2 选择确定总体参数··························································· 2

  2.3 装载机底盘部件型式设计·················································· 11

第3章 牵引计算································································ 22

  3.1 柴油机与变矩器联合工作的输入与输出特性曲线······················· 22

  3.2 确定档位及各档传动比···················································· 28

  3.3 运输工况牵引特性曲线···················································· 31

  3.4 求出各档最高车速并分析牵引特性······································· 33

第4章 总体布置································································ 35

  4.1 总体布置草图的基准······················································· 35

  4.2 各组成部件的位置························································· 35

  4.3 计算平衡重·································································· 39

4.4 桥荷的分配································································· 40

4.5 验算轮胎载荷······························································· 42

4.6 总体布置图·································································· 43

第5章 行星式动力换挡变速箱设计········································ 43

5.1 传动比的确定 ······························································ 44

  5.2 传动简图设计 ······························································ 45

  5.3 配齿计算 ··································································· 47

5.4 离合器设计·································································· 53

5.5 齿轮设计····································································· 56

5.6 轴的设计····································································· 59

5.7 轴承的选择计算····························································· 64

第6章 毕业设计小节··························································· 66

参考文献············································································68

毕业实习报告····································································· 69

附:英文翻译

    英文原文

   第1章前言

 ZL50轮式装载机是一种较大型的以装卸散状物料为主的工程机械,因其具有作业速度快、效率高、机动性好、操作轻便等优点,所以对于加快工程建设速度,减轻劳动强度,提高工程质量,降低工程成本都发挥着重要的作用,是现代机械化施工中不可缺少的装备之一。

    ZL50轮式装载机是高效率、用途广泛的工程机械,广泛应用于建筑、矿山、道路、水电和国防建设等国民经济各个部门,不仅对松散的堆积物料可以进行装、运、卸等作业,还可以对岩石、硬土进行轻度挖掘工作。

ZL50轮式装载机属于ZL系列,采用轮式行走系,液力机械传动系,铰接式车架工作装置采用液压操纵。此类装载机具有机动性好、转向灵活、生产率高、操纵轻便等特点,一般后桥布置为摆动桥,增加了整机的稳定性,所以该机的安全性好。

ZL50轮式装载机为四轮驱动装载机,作业时以全轮驱动,空车运输时,为防止寄生功率,仅用前轮驱动,因此后桥的传动可以用啮合套脱开。ZL50装载机采用液压与液力机械传动,具有变速平稳、传动比大、作业效率高和无级变速等特点,应用十分广泛。其变速器采用行星齿轮变速器,换档操纵为液压式。ZL50装载机的主要特点:采用双涡轮变矩器、具有两个前进档一个倒退档的双行星传动动力换档变速器,以及能实现脱起动,内燃机熄火转向,排气制动的“三合一”机构。 

内容简介:
Science China Press and Springer-Verlag Berlin Heidelberg 2010 Review Mechanical Engineering SPECIAL TOPIC: Huazhong University of Science and Technology October 2010 Vol.55 No.30: 34083418 doi: 10.1007/s11434-010-3247-7 Tool path generation and simulation of dynamic cutting process for five-axis NC machining DING Han1*, BI QingZhen2, ZHU LiMin22 State Key Laboratory of Mechanical System and Vibration, Shanghai Jiao Tong University, Shanghai 200240, China Received October 9, 2009; accepted December 29, 2009 Five-axis NC machining provides a valid and efficient way to manufacture the mechanical parts with complex shapes, which are widely used in aerospace, energy and national defense industries. Its technology innovations have attracted much attention in re-cent years. In this paper, the state-of-the-art techniques for five-axis machining process planning are summarized and the chal-lenging problems are analyzed from the perspectives of tool path generation, integrated geometric/mechanistic simulation and machining stability analysis. The recent progresses in accessibility-based tool orientation optimization, cutter location (CL) plan-ning for line contact and three-order point contact machining, shape control of cutter envelope surface and milling stability pre-diction are introduced in detail. Finally, the emerging trends and future challenges are briefly discussed. five-axis machining, tool path generation, integrated geometric/mechanistic simulation, dynamics simulation Citation: Ding H, Bi Q Z, Zhu L M, et al. Tool path generation and simulation of dynamic cutting process for five-axis NC machining. Chinese Sci Bull, 2010, 55: 34083418, doi: 10.1007/s11434-010-3247-7 In conventional three-axis NC machining only the transla-tion motions of the cutter are permitted while the cutter ori-entation is allowed to change in a five-axis machine tool because of the two additional rotational axes. The advan-tages of five-axis NC machining mainly depend on the con-trol of tool orientations: (1) The collision between the part and the cutter can be avoided by selecting the accessible tool orientation, which provides the ability to machine the complicated shapes such as aerospace impeller, turbo blade and marine propeller. (2) A large machining strip width can be obtained if the tool orientation is properly planed so that the tool tip geometry matches the part geometry well. Also, the highly efficient flank milling can be applied to machine aerospace impeller by using a five-axis machine tool. (3) The cutting conditions can be improved in five-axis ma-chining. For example, it is possible to shorten the tool overhang length if the tool orientation is optimized. Deter-mining the safe and shortest tool length is very helpful when *Corresponding author (email: dinghan) the surface is machined in a confined space, in which only the small-diameter cutters can be used. The cutting area of a cutter, which affects the cutting force, cutter wear and ma-chined surface quality can also be controlled by changing the cutter orientation. Besides the above advantages, there exist several chal-lenging problems in five-axis machining. Since the tool orientation is adjustable, it is hard to image the complicated spatial motion of the tool. Thus, it is much more difficult to generate the collision-free and high efficient tool paths, which limits its wide application. Furthermore, the cutting force prediction and dynamics simulation are more complex because the involved cutting parameters are time-varying during the machining process. Current works about five- axis machining fall into three categories 1: tool path gen-eration, integrated geometric/mechanistic simulation and dynamics simulation, as shown in Figure 1. Tool path gen-eration is the process to plan the cutter trajectory relative to the part based on the part model, machining method and tolerance requirement. The cutter trajectory affects greatly DING Han, et al. Chinese Sci Bull October (2010) Vol.55 No.30 3409 the cutting efficiency and quality. It is also the foundation of integrated geometric/mechanistic simulation, which de-pends on the cutting geometry and cutting force modeling techniques. The cutting geometry reflects the meshing state between the cutter and the workpiece during the material removing process. By integrating the cutting geometry and cutting force models, the transient cutting force can be pre-dicted. The cutting force then can be applied to dynamics simulation, feedrate scheduling, and prediction and com-pensation of deformation. The goal of dynamics simulation is to predict the cutting stability and the machined surface profile based on the cutting force and the dynamics charac-teristics of the machine tool-cutter-fixture system. Dynam-ics simulation is helpful to optimize the cutting parameters and the tool path. The literatures on five-axis NC machining are enormous. A lot of related commercial systems have been developed, such as the general-purpose CAM softwares UG and CATIA, the special CAM software Max-AB for machining impeller and Turbosoft for machining blade, and the dy-namics simulation software CutterPro. European Commis-sion supported a project about flank milling optimization that is called “Flamingo”. Because of the obvious advan-tages of flank milling in cutting efficiency and surface qual-ity, a number of famous companies (SNECMA, Rolls Royce, Dassault Systmes) and a university (Hannover) participated in this project. The researches on five-axis high-efficiency and high-precision machining have also been carried out in some famous companies, such as United Technologies, Pratt it is difficult to automatically generate the opti-mum tool orientations that consider simultaneously all the Figure 1 Three challenging problems in five-axis NC machining. objectives required by the practical cutting process, such as collision avoidance, large effective cutting width, globally cutter orientation smoothness and shorter tool length. Also, most of the existing works about dynamics simulation aim to three-axis machining. Models and algorithms applicable to five-axis machining need to be explored. 1 Tool path generation Tool path generation is the most important technology in NC programming. The critical problem in five-axis ma-chining is to plan cutter orientations. Theoretically, the tool orientation can be any point on the Gauss Sphere. In fact, the feasible tool orientations are only a limited area on the Gauss Sphere because of the constraints of global collision avoidance and machine joint angle limits. To improve ma-chining efficiency and quality, the tool orientation of each cutter location (CL) data should be optimized by consider-ing the important factors related to a practical cutting proc-ess. The factors consist of geometrical constraints, kine-matic constraints, dynamic characteristics and physical fac-tors. How to take into account these factors is the most challenging issue in the research of tool path generation. 1.1 Collision avoidance Collision avoidance must be first considered in the process of tool path generation. There are mainly two kinds of ideas to avoid interference: (1) First generating and then adjusting cutter orientation to avoid collision. (2) Access-based tool path generation. With the former idea, cutter orientations are first planned according to some strategies. A collision detection method is then used to detect the collision be-tween the tool and the parts. If collision occurs, the tool orientations must be changed as shown in Figure 2. With the latter idea, the cutter orientations are generated directly in the accessibility cones as shown in Figure 3. The research about the first idea focuses on the algo-rithms to improve the collision detection efficiency and ad-just cutter orientations to avoid collision. In practical appli-cations, tool paths are usually composed of thousands to hundred thousands of tool positions. The collision detection often requires large computation time and resource. There-fore lots of algorithms have been proposed to improve the computation efficiency of collision detection 2,3. When machining a complex shape, the detection and adjustment processes usually repeat several times. Collision avoidance is of first concern. It is difficult to consider other factors affect-ing the cutting process when adjusting cutter orientations. The access-based tool path generation method consists of two steps. Collision-free cutter orientations at every cutter contact (CC) point are first computed. The set of colli-sion-free cutter orientations is called accessibility cone. The cutter orientations are then generated in the accessibility 3410 DING Han, et al. Chinese Sci Bull October (2010) Vol.55 No.30 Figure 2 Detecting and adjusting cutter orientation to avoid collision 2. (a) Collision detection; (b) adjust cutter orientation. Figure 3 Access-based collision-free tool path generation. (a) Accessi-bility cone; (b) collision-free tool path. cones. The most obvious merit of this method is that the iterative process of adjusting cutter orientations can almost be avoided. Based on the accessibility cone, the manufac-turability can be directly determined. Furthermore, the cut-ter orientation optimization can be carried out in the colli-sion-free space. Other objectives such as cutting forces and velocity smoothness may also be considered. The problem with this idea is the difficulty in efficiently computing ac-cessibility cones. Usually computing accessibilities will cost large computation time because complex shape may consist of hundreds of thousands of polygonal meshes. Some algo-rithms were proposed to improve computation efficiency such as the C-space (Configuration Space) methods 4,5 and visibility-based methods 610. Though C-space is an elegant concept to deal with collision avoidance, the free C-space cannot be explicitly and efficiently computed. Wang et al. 5 showed that the elapsed time to compute an accessibility cone for a part composed of only 10000 trian-gles would be 1190.33 min. Furthermore, the algorithm did not consider the collision of the tool holder. A cutter can be abstracted as a light ray that emits from the CL point if its radius is ignored. Then the problem of collision avoidance is transformed into that of visibility. We 68 described cutters visibility cone using the concept of C-space and proposed three strategies to accelerate the computation speed using the hidden-surface removal techniques in com-puter graphics. The manufacturability of a complex surface was also analyzed based on the visibility cone. However, the conventional visibility is only the necessary condition of accessibility because a milling tool usually consists of sev-eral cylindrical shapes with finite radii. The real accessible directions cannot be directly obtained from the visibility cone, and secondary collision checking and avoidance strat-egies are still needed 9. The accessibility will be equal to the visibility if both the machined surface and the interfer-ence checking surface are replaced by their offset surfaces 10. However, the offset surface is usually not easy to ob-tain and the collision avoidance of the tool holder cannot be guaranteed. Furthermore, the method only applies to ball- end cutters and cannot be extended to other types of cutters. We 11,12 proposed a high-efficient algorithm to compute the accessibility cone using graphics hardware. The algo-rithm has almost linear time complexity and applies to both flat-end and torus-end cutters. Generally, the CL point can be specified by the CC point, outward normal direction of the machined surface and cutter orientation. If the viewing direction is opposite to the cutter orientation, the global ac-cessibility of the cutter is then equal to the complete visi-bilities of the involved cylinders and cones. This equiva-lence provides an efficient method for detecting the acces-sibility of the milling cutter by using the occlusion query function of the graphics hardware. The computation effi-ciencies of the three algorithms are compared in Table 1. It is found that the computation time of our algorithm is less than 2% of that in 9 even though both the number of tri-angles and the number of cutter orientations are greater than 10 times of those in 9. The average computation time for one cutter orientation at one contact point is less than 2 of that in 9. The average computation time is also much less than that in 3 even though the number of inputted triangles is much greater than that in 3. 1.2 Cutting efficiency Nowadays, ball-end cutters are widely employed for five-axis NC machining. The major advantages of ball-end milling are that it applies to almost any surface and it is Table 1 The comparison of computation time Inputted models Method Computation platform Triangle Cutter center point Cutter orientations Computation time Average computa-tion time Ref. 9 SGI work station, Dual CPU 250M 10665 1500 80 51.63 m 2.58102s Ref. 3 CPU 2.4G, RAM 512M 12600 50000 1 61.61s 1.23103s Our method 12 CPU 2.4G, RAM 512M 139754 2000 1026 60.53 s 2.95105s DING Han, et al. Chinese Sci Bull October (2010) Vol.55 No.30 3411 relatively easy to generate the tool path. From the manufac-turers point of view, however, the main disadvantage of ball-end milling is that it is very time consuming. It may require more finish passes and each pass removes only a small amount of material. Compared with ball-end cutter, non-ball-end cutter possesses more complex geometry, and exhibits different “effective cutting profiles” at different locations. Thus, it is possible to position the cutter so that its “effective cutting profile” well matches the design surface, which results in a great improvement of the machining strip width. Hence, increasing attention has been drawn onto the problem of tool path optimization for milling complex sur-faces with non-ball-end cutters. In five-axis machining, the machined surface is formed by the swept envelope of the cutter surface. The true ma-chining errors are the deviations between the design surface and the cutter envelope surface. It is well known that the shape of the cutter envelope surface cannot be completely determined unless all the cutter positions are given 13,14. Due to the difficulty and complexity in locally modeling the cutter envelope surface, most works adopted the approxi-mate or simplified models, which formulate the problem of optimal cutter positioning as that of approximating the cut-ter surface to the design surface in the neighborhood of the current CC point 15. These optimization models do not characterize the real machining process. Also, they only apply to certain surfaces or cutters. Only a few works have addressed the cutter positioning problem from the perspective of local approximation of cutter envelope surface to design surface 1517. For a flat-end or disk cutter, Wang et al. 15 and Rao et al. 16 developed the third- and second-order approximate models of the cutter envelope surface, respectively. However, for such a cutter, its envelope surface is swept by the cutting circle, which is not a rotary surface. Therefore, the two me-thods cannot be applied to other types of rotary cutters. Re-cently, Gong et al. 17 developed a mathematical model that describes the second-order approximation of the enve-lope surface of a general rotary cutter in the neighborhood of the CC point, and then proposed a cutter positioning strategy that makes the cutter envelope surface have a con-tact of second-order with the design surface at the CC point. However, theoretically speaking, a third-order contact be-tween the cutter envelope surface and the design surface could be achieved by adjusting the cutter orientation. This means that the cutter location planning based on the sec-ond-order model does not take full advantage of the effi-ciency and power that the five-axis machining offers. The above models are not compatible with each other. Also, the optimal CL is determined by solving two equations derived from the second- and third-order contact conditions. Due to the constraints of machine joint angle limits, global colli-sion avoidance and tool path smoothness, maybe there is no feasible solution to this system of equations. In our recent works 18,19, the geometric properties of a pair of line contact surfaces were investigated. Then, based on the observation that the cutter envelope surface contacts with the cutter surface and the design surface along the characteristic curve and cutter contact (CC) path, respec-tively, a mathematical model describing the third-order ap-proximation of the cutter envelope surface according to just one given cutter location (CL) was developed. It was shown that at the CC point both the normal curvature of the normal section of the cutter envelope surface and its derivative with respect to the arc length of the normal section could be de-termined by those of the cutter surface and the design sur-face. This model characterizes the intrinsic relationship among the cutter surface, the cutter envelope surface and the design surface in the vicinity of the CC point. On this basis, a tool positioning strategy was proposed for effi-ciently machining free-form surfaces with non-ball-end cutters. The optimal CL was obtained by adjusting the in-clination and tilt angles of the cutter until its envelope sur-face and the design surface had the third-order contact at the CC point, which resulted in a wide machining strip. The strategy can handle the constraints of joint angle limits, global collision avoidance and tool path smoothness in a nature way, and applies to general rotary cutters and com-plex surfaces. Numerical examples demonstrated that the third-order point contact approach could improve the ma-chining strip width greatly a
温馨提示:
1: 本站所有资源如无特殊说明,都需要本地电脑安装OFFICE2007和PDF阅读器。图纸软件为CAD,CAXA,PROE,UG,SolidWorks等.压缩文件请下载最新的WinRAR软件解压。
2: 本站的文档不包含任何第三方提供的附件图纸等,如果需要附件,请联系上传者。文件的所有权益归上传用户所有。
3.本站RAR压缩包中若带图纸,网页内容里面会有图纸预览,若没有图纸预览就没有图纸。
4. 未经权益所有人同意不得将文件中的内容挪作商业或盈利用途。
5. 人人文库网仅提供信息存储空间,仅对用户上传内容的表现方式做保护处理,对用户上传分享的文档内容本身不做任何修改或编辑,并不能对任何下载内容负责。
6. 下载文件中如有侵权或不适当内容,请与我们联系,我们立即纠正。
7. 本站不保证下载资源的准确性、安全性和完整性, 同时也不承担用户因使用这些下载资源对自己和他人造成任何形式的伤害或损失。
提示  人人文库网所有资源均是用户自行上传分享,仅供网友学习交流,未经上传用户书面授权,请勿作他用。
关于本文
本文标题:ZL50装载机总体及变速箱设计(第二行星排)【4张CAD图纸和说明书】
链接地址:https://www.renrendoc.com/p-10415713.html

官方联系方式

2:不支持迅雷下载,请使用浏览器下载   
3:不支持QQ浏览器下载,请用其他浏览器   
4:下载后的文档和图纸-无水印   
5:文档经过压缩,下载后原文更清晰   
关于我们 - 网站声明 - 网站地图 - 资源地图 - 友情链接 - 网站客服 - 联系我们

网站客服QQ:2881952447     

copyright@ 2020-2025  renrendoc.com 人人文库版权所有   联系电话:400-852-1180

备案号:蜀ICP备2022000484号-2       经营许可证: 川B2-20220663       公网安备川公网安备: 51019002004831号

本站为文档C2C交易模式,即用户上传的文档直接被用户下载,本站只是中间服务平台,本站所有文档下载所得的收益归上传人(含作者)所有。人人文库网仅提供信息存储空间,仅对用户上传内容的表现方式做保护处理,对上载内容本身不做任何修改或编辑。若文档所含内容侵犯了您的版权或隐私,请立即通知人人文库网,我们立即给予删除!